It snuck up on me so fast, I forgot to ask - are any of my SysAdmin’s Journey readers going to San Franciso for DrupalCon? If so, contact me, and we’ll see if we can meet up for a beer! I’m posting this from DIA, so if you happen to be here and want to grab a bite to eat, ping me. I’m flying out to SF at about 12:30pm MDT.
New Linode StackScript: Pantheon Mercury (High Performance Drupal in 10 Minutes or Less)
For those who might not know, Pantheon Mercury is:
… a drop-in replacement for your Drupal website hosting service that delivers break-through performance. Mercury can serve two-hundred times more pages per second and generate pages three times faster than standard hosting services.
Mercury achieves this by using open-source technologies like so many ingredients of a complex dish - a little Varnish here, a dash of Memcached there, a hint of the Alternative PHP Cache, a healthy dose of Tomcat and Solr, all based upon the Pressflow distribution of Drupal. None of it is anything you couldn’t do yourself – many before Chapter Three had done it actually. However, they were the first to tie it all together using BCFG2, and release an Amazon EC2 AMI image of it. As word spread, many liked the idea of Mercury, but wanted to brew their own non-EC2 instance. While they posted a wiki article on how to do it yourself, they went to work on native support for RackSpace. When I read Josh Koenig’s post on the Linode blog stating he wanted to bring Mercury to Linode, I made a mental note. Some time passed, I became much more involved in Drupal, and I decided to volunteer to write the StackScript . Josh said okay, and put me in touch with Greg Coit, their resident sysadmin, and we went to work. Fast forward a couple weeks, and we’ve announced a beta! The StackScript is quite complete - it supports Ubuntu Jaunty and Karmic, and can use the current stable branch or the soon- to-be-released 1.1 development branch. Once Lucid is released, we’ll test to make sure it works there as well. I want to thank Greg for all his help. We found some bugs in Ubuntu, some quirks in the memcached init script, and fixed many bugs and added some features to their BCFG2 bazaar repo. Thanks also go out to Josh for his oversight and guidance. It was a great time, a great learning experience, and I came out of it with some new colleagues (and some free beers at DrupalConSF). Feel free to read up on my experiences with Linode, and if you like what you see, click on one of the many links to Linode from my blog. If you sign up and stay a customer for 90 days (trust me, you will), I’ll get $20 credited to my account. Feel free to comment below about the StackScript and let me know about any issues you might find.
Tracking Drupal's Outbound HTTP Requests Using Tcpdump
While working on tweaking performance for a client, I was able to shave 7 seconds of PHP execution time time off the homepage load. The cause was eventually tracked down to calls out to TinyURL for every node being rendered. The core problem came from the service links module. We were able to fix it by disabling short URL’s in the module, but the problem has been addressed in the current pre-release 2.x branch by using caching. We might have ended up discovering this by disabling module after module one at a time, but that would have taken forever. In today’s world of API’s and social media, it’s very common for a module to make calls to outside websites. However, care should be taken by the module authors when coding in these features. In our example, each call to TinyURL was fairly fast (300 - 400ms average), but on a homepage displaying 25 nodes, that adds over 7 seconds page load time. Think of the impact if TinyURL experienced a large slowdown, or even an outage? As far as I know, Drupal doesn’t give you a way out of the box to track such requests. However, using the tcpdump binary which is available on virtually all Unix variants, we can see exactly what’s happening. Note that you need root access to run tcpdump. Let’s say that the IP address of your primary interface is 10.0.0.1. By using this tcpdump command, we can see all outbound HTTP and HTTPS requests in real time: tcpdump src host 10.0.0.1 and dst port 80 or dst port 443
If you don’t get any traffic after a few seconds, go hit your /cron.php page - this should generate some traffic like this for you to see: Here we can see that our host is making a bunch of outbound requests to master.drupal.org. This is because the “Update Status” module is checking to see what upgrades are available for us. What if you see traffic and don’t know what module is causing it? grep to the rescue! In order to find out which module was making the calls to TinyURL, we ran the following command: grep -R ‘tinyurl.com’ /path/to/drupal/sites/all/modules/*
This returned one hit, from /path/to/drupal/sites/all/modules/service_links/service_links.module. By disabling the short links feature within the module we decreased page load time by 7 seconds!
Register for Free DrupalCon Tickets From DrupalModules.com!
Make sure you sign to win free tickets to DrupalCon SF 2010 over at DrupalModules.com.
Drupal StackScript for RH Derivatives on Linode (Instant Drupal!)
StackScripts are a relatively new offering from Linode that allow users to
build their own installation script by “stacking” previously existing scripts
together to build the machine you want. You can keep your StackScript to
yourself, or publish it for the world to use. Deploying a distribution with a
StackScript takes only about 5 minutes, afterwards you have a fully configured
system with applications up and running. Here’s a sneak-peek at a my Drupal
StackScript for RH Derivatives deployment just
before launch: 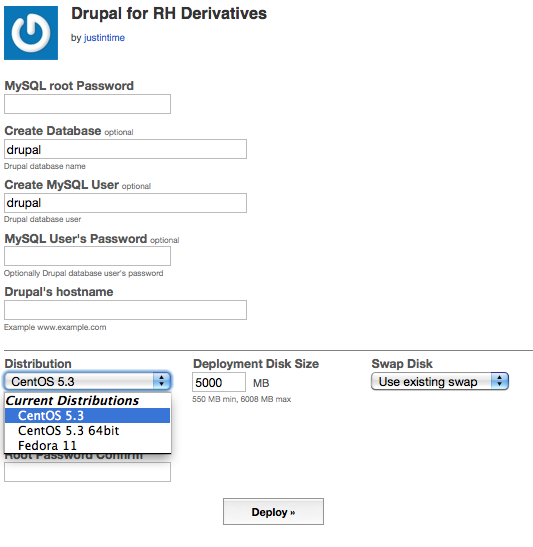 Many of the users of
Linode
appear to prefer Ubuntu, and there’s good reason – it’s a great distribution.
I run it on all my laptops and most of my desktops. However, I personally find
it a bit too bleeding edge for my servers and prefer CentOS for the server
room. Currently there are 16 StackScripts available for Ubuntu, with only 3
available for CentOS. Well, after today, there’s now 6 for CentOS! After
clicking the deploy button, you’ll have the images ready to go in less than a
minute. Boot the config, and the StackScript will run on first boot - when
it’s done, you’ll have a secured and configured LAMP stack,
drush install, Drupal
install, and all updates applied via yum. I’ve published these StackScripts so
that anyone with a
Linode
can use them with their CentOS and Fedora installations:
Many of the users of
Linode
appear to prefer Ubuntu, and there’s good reason – it’s a great distribution.
I run it on all my laptops and most of my desktops. However, I personally find
it a bit too bleeding edge for my servers and prefer CentOS for the server
room. Currently there are 16 StackScripts available for Ubuntu, with only 3
available for CentOS. Well, after today, there’s now 6 for CentOS! After
clicking the deploy button, you’ll have the images ready to go in less than a
minute. Boot the config, and the StackScript will run on first boot - when
it’s done, you’ll have a secured and configured LAMP stack,
drush install, Drupal
install, and all updates applied via yum. I’ve published these StackScripts so
that anyone with a
Linode
can use them with their CentOS and Fedora installations:
- StackScript Bash Library for RH Derivatives: This is a port of Chris Aker’s (of Linode) Bash Library for Ubuntu. You don’t use this script directly, it’s strictly for inclusion by other scripts.
- Drupal Library for RH Derivatives: This library provides two functions, install_drush and install_drupal.
- Drupal for RH Derivatives: This is a the StackScript used in the screenshot above. After clicking on the Deploy button, you’ll have a working Drupal installation up and running in about 5 minutes. If you use them and find any bugs or have any RH-based StackScripts you’d like made available, post a comment and I’ll see what I can do. In the interest of full disclosure, the links to Linode in this article have a referral code in them that will give me $20 credit if you sign up and keep your account open for 90 days. If you like these StackScripts, please use my links to sign up for a Linode - you’ll wonder how you did without one!
Sysadmin Humor
I laughed out loud when I saw this XKCD comic this morning:

Performing a CentOS Anaconda-based Install on a Linode for Kickstart, Root LVM and SELinux Features
Linode rocks. Seriously, read my review. I was talking to a co-worker (whom I converted to Linode as well) about how I would pay double the amount to keep my Linode now that I know how much I use it. Don’t tell them that, they’re cheap :) If you find this article helpful (or my article about moving VM’s to and from Linode), please consider clicking one of the links in this article to sign up for a Linode - if you sign up for 90 days, I’ll get $20 credited to my account. I was setting up a second Linode that was to be a testing ground for some StackScripts I’m working on. The new Linode will eventually replace my existing one. For whatever reason, the most recent version of CentOS they had available was 5.3. Not a big deal, I can ‘yum upgrade’ up to 5.4 after installation. Well, after doing so, I found that a lot of features that I wanted had been stripped out. In Linode’s defense, it’s in their best interest to offer very stripped down images for their customers. The one feature I wanted that I couldn’t get enabled was SELinux, and simply installing the packages still wouldn’t let me use ‘setenforce 1’ to get it turned on. My best guess as to why is that the Linode kernel didn’t support it, but I honestly didn’t troubleshoot it too much. I really wanted root LVM capabilities as well, so I decided that a full-on anaconda based installation was the way to go. Plus, I couldn’t find anything in the forums about it, so there was the lure of being the first to do it ;-) Well, thanks to the flexibility offered by Linode, not only can you do a anaconda-based installation (with optional Kickstart), but you can do so using the GUI over VNC if you’re so inclined!
Step 1: Setup Finnix
Finnix is the distro of Linode’s choice for ‘rescue’ operations on your
server. Think of it as a Swiss Army knife - it’s a very powerful tool that
takes very little setup. For more on Finnix, checkout the Linode Library
article. First, we
need to setup a very small, 20MB ext3 disk that will house our installation
kernel and initrd. Set up another ext3 disk of 100MB to be mounted at /boot
for PV-GRUB. Finally, setup your raw disk that will be used for the OS
installation. Since we’ll be using LVM, you can easily add to and resize your
disk later, so don’t overdo it. I went with 5GB for my root disk. If you’re
following along, here’s what you should have:  Now, setup a Finnix configuration profile. Click on “Create a new
configuration profile”, and type “Finnix Rescue” for the label. For the
kernel, select “Recovery - Finnix (kernel)”. For /dev/xvda, select the
“Recovery - Finnix (iso)”. For /dev/xvdb, select the “Centos 5.4 Install
Disk”. For uncompressed initrd image, select “Recovery - Finnix (initrd).
Leave the other settings at defaults, and save the profile. Here’s what it
should look like:
Now, setup a Finnix configuration profile. Click on “Create a new
configuration profile”, and type “Finnix Rescue” for the label. For the
kernel, select “Recovery - Finnix (kernel)”. For /dev/xvda, select the
“Recovery - Finnix (iso)”. For /dev/xvdb, select the “Centos 5.4 Install
Disk”. For uncompressed initrd image, select “Recovery - Finnix (initrd).
Leave the other settings at defaults, and save the profile. Here’s what it
should look like: 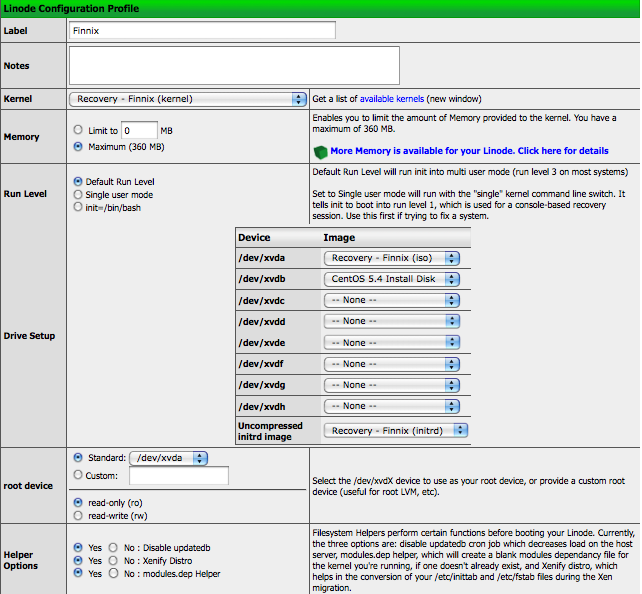
Step 2: Upload the Xen-enabled Kernel and Initrd from the DVD
Next, boot Finnix from your Linode control panel. Click on the console tab, and launch the AJAX console. Once at the console, we need to mount our install disk, and fetch the xen-enabled kernel and initrd from your favorite mirror. Mount the installation disk, change directories, and download the files:
mount /dev/xvdb /mnt/xvdb
cd /mnt/xvdb
for f in initrd.img vmlinuz; do
wget http://mirror.unl.edu/centos/5.4/os/i386/images/xen/${f}
done
cd
umount /mnt/xvdb
Now, shutdown Finnix from the Linode control panel.
Step 3: Setup the CentOS configuration profile
Create a new profile, and name it CentOS 5.4. For the kernel, select “pv-grub-
x86_32”. For /dev/xvda, select “CentOS 5.4 PV-GRUB Boot”. For /dev/xvdb choose
“CentOS 5.4 OS Disk”. For /dev/xvdh, select our “CentOS 5.4 Install Disk”.
Point the root device to a custom location: “/dev/mapper/VolGroup00-LogVol00”.
Leave the rest as defaults, here’s a screenshot: 
Step 4: Boot the CentOS configuration profile and start the installation
Save the profile, and boot it. Note that it won’t boot automatically, we have to point GRUB in the right direction first. You’ll be greeted by a scary- looking ‘grubdom>’ prompt. Now, we need to tell grub to boot our install kernel and initrd:
root (hd2)
kernel (hd2)/vmlinuz
initrd (hd2)/initrd.img
boot
Note that if you want to do a kickstart install, you would append ks=http://my.com/this.ks to the kernel line above. More on this later. Once the kernel loads, you’ll be presented with the familiar anaconda text-based installer. Choose your language, and your installation type. I prefer HTTP from a mirror. If you choose to do the same, use the mirror hostname for the Web site name, and the path to the directory that contains all the release notes – usually it’s /centos/5.4/os/i386/. Anaconda will fetch the stage2 image, then launch the installer. Here’s where it gets cool - it will give you a choice to “Start VNC”. If you choose this option, you can connect to your Linode via VNC (note it launches on display 1, not 0), and complete the installation via a GUI. Install as you would any other CentOS installation. Make note of where your root directory is at. The installer may complain about your /dev/xvdh being a loop device, tell anaconda to ignore it. Exclude /dev/xvda from any partitioning, we’ll set that up manually later.
Step 5: Modify the CentOS configuration profile and start the operating
system
Once you click the “Reboot” button on the installer, you’ll be disconnected from VNC. Your machine will be restarted, but it will stick at the grubdom prompt again - that’s okay. We’ll be stuck at the grubdom> prompt one more time - use this to tell it to boot CentOS using the boot partition the installer setup for us:
grubdom> root (hd1,0)
grubdom> kernel (hd1,0)/vmlinuz-2.6.18-164.el5xen
grubdom> initrd (hd1,0)/initrd-2.6.18-164.el5xen.img
grubdom> boot
You will then boot into CentOS - exit the system settings GUI - you can run it again later by running system-config-securitylevel-tui. Now we need to setup our boot disk so that pv-grub knows how to boot our kernel so we’re not consistently prompted upon reboot. Linode uses PV-GRUB to boot our kernel, and it’s looking for a ‘boot’ directory directly on /dev/xvda. For more details, see the Linode Wiki. Run this as root, and make sure your block devices are aligned with mine before copy/pasting:
mkdir /mnt/newboot
mkfs.ext3 /dev/xvda
mount /dev/xvda /mnt/newboot
rsync -av /boot /mnt/newboot
cd /mnt/newboot/boot
ln -s . boot
cd
umount /mnt/newboot
umount /boot
e2label /dev/xvdb1 oldboot
e2label /dev/xvda /boot
That’s it - reboot, and you should be up and running! You can create a LVM physical volume out of the old boot partition on /dev/xvdb1, or just leave it around unused.
Streamlining the process with Kickstart
We can use kickstart to really streamline the process. Follow steps 1, 2, and 3 above, but on step 4, replace the kernel line with this:
kernel (hd2)/vmlinuz ks=http://www.sysadminsjourney.com/assets/files/linode-minimal.ks
That’s it! The kickstart file handles partitioning, and setting up the right boot partition, as well as disabling unneeded services that you don’t need for a Linode. Make sure you check out the file http://www.sysadminsjourney.com/assets/files/linode-minimal.ks - your root password is there, change it immediately! Stay tuned for my CentOS StackScripts!
Assign Different Values to Different Nodes via One Action in Views Bulk Operations
The Views Bulk Operations module (a.k.a. VBO), is a godsend for busy Drupal site administrators. Don’t just take my word for it - Lullabot wrote a chapter about it in O'Reilly’s Using Drupal, it’s included in the Open Atrium Drupal distribution, and it’s even used on Drupal.org! Out of the box, VBO does a lot to streamline the things you do everyday, so that you spend less time doing them. A perfect example is bulk content moderation - with a few clicks of the mouse, you can mark a huge amount of comments as spam. You can even enable batch processing with a single click of a mouse so that you can literally do thousands of these without timing out.
VBO was attractive enough that we decided to offload the bulk/batch operations of Node Gallery to VBO. Integration for the most part was surprisingly easy - VBO “speaks” in Drupal Actions, so by writing actions, we were writing integration with VBO.
There’s one undocumented case where VBO can be used that was critical for us. Most VBO actions you will find perform one action to a set of nodes, one at a time. Often times, that one action is to set a value of some sort on said nodes. In the case of Node Gallery, we wanted to be able to assign different weight values (used for sorting) to a bunch of nodes. The key here is that we aren’t assigning a value of ‘2’ to all selected node’s weight, we want to assign a weight of 2 to node #1, 3 to node #2, 8 to node #3, and so on. While not straightforward, it’s definitely achievable.
The general idea we’ll be taking is to have VBO display a list of nodes to the admin. The admin can place a checkmark next to the nodes that he wishes to change the weight on, then select “Change the image’s weight” from the action dropdown, and click submit. We will then draw a form that includes some summary information about the nodes, and a select box with the node’s current weight. The admin sets the weight he wants for each node, then clicks submit. VBO then takes over, assigning each node the proper weight. Let’s get into the code - first we implement hook_action_info(), telling Drupal that we have actions to provide:
<?php
/**
* Implementation of hook_action_info().
*/
function node_gallery_action_info() {
  return array(
    'node_gallery_change_image_weight_action' => array(
      'description' => t('Change image weight (sort order)'),
      'type' => 'node',
      'behavior' => array('changes_node_property'),
      'configurable' => TRUE,
      'hooks' => array(
        'node' => array('presave'),
      ),
    ),
  );
}
The only real items of note in the hook above are setting ‘configurable’ to true, and setting ‘behavior’ to ‘changes_node_property’. Setting ‘configurable’ allows us to display a custom form, and setting the behavior tells VBO that we’ll be modifying the node. In turn, VBO will call $node->save on each node after it’s been processed. Next, we define our configurable action’s form function:
<?php
function node_gallery_change_image_weight_action_form($context = array()) {
  //We're being called from VBO - we can do extra validation
  if ($context['view']->plugin_name == 'bulk') {
    //@todo: Add imagefield support in our sort form, and theme it with draggable items
    $sql = "SELECT n.nid, n.title, ngi.weight FROM {node} n " .
            "INNER JOIN {node_gallery_images} ngi ON n.nid = ngi.nid " .
            "WHERE n.nid IN (". db_placeholders($context['selection']) .")";
    $result = db_query($sql,$context['selection']);
    $delta = count($context['selection']) > 20 ? intval(count($context['selection'])/2) : 10;
    $form['node_gallery_change_image_weight_action']['#tree'] = TRUE;
    while ($image = db_fetch_object($result)) {
      $form['node_gallery_change_image_weight_action'][$image->nid]['title'] = array(
        '#type' => 'item',
        '#value' => $image->title,
      );
      $form['node_gallery_change_image_weight_action'][$image->nid]['weight'] = array(
        '#type' => 'weight',
        '#title' => t('Weight'),
        '#default_value' => $image->weight,
        '#delta' => $delta,
      );
    }
  }
  //We're called from a standard advanced action where we assign one weight to all nodes
  else {
    $form['node_gallery_change_image_weight_action'] = array(
      '#type' => 'weight',
      '#title' => t('Weight'),
      '#description' => t('When listing images in a gallery, heavier items will sink at the lighter items will be positioned near the top'),
      '#delta' => 10,
    );
    if (isset($context['imageweight'])) {
      $form['node_gallery_change_image_weight_action']['#default_value'] = $context['imageweight'];
    }
  }
  return $form;
}
To define your form function, simply append ‘_form’ to your action name and you have the function name. Nothing too wild and crazy in the form function above, but there’s two key points:
- Line 3 shows you how you can detect when your function is being called from a VBO view.
- When your function is called from VBO, it will pass you the nid’s of the selected nodes in the array $context[‘selected’]
Next, we define our submit function (you can define a validate function if needed). Our submit function will pull the important data from the submitted form and assemble it into a concise array that our action can use. Here’s our submit function:
<?php
function node_gallery_change_image_weight_action_submit($form, $form_state) {
  //We're setting all nodes to the same weight
  if (is_numeric($form_state['values']['node_gallery_change_image_weight_action'])) {
    $weight = $form_state['values']['node_gallery_change_image_weight_action'];
  }
  //VBO is passing us a set of nids
  else {
    foreach ($form_state['values']['node_gallery_change_image_weight_action'] as $nid => $val) {
      $weight[$nid] = $val['weight'];
    }
  }
  return array('imageweight' => $weight);
}
The key here is that if we are passed in the “single value” form, we stick the value into the variable $weight as a simple scalar. If we are passed in form data from the VBO “multi value” form, then $weight becomes an associative array where the key is the nid, and the value is the weight for that node.
Finally, we define our action function. Our action is pretty simple, because it will only be called with one node and one value. This is a key thing to remember when writing code for VBO - even though you are working with batches of nodes, VBO is essentially one big loop around the actions – it executes the action once for each node. So, in our action, we simply check to see if the value of the $context[‘imageweight’] index that we passed from our submit function is an integer or an array, and perform the correct operation on the node to assign it it’s new weight. Once this function returns, VBO will call $node->save for us.
<?php
function node_gallery_change_image_weight_action(&$node, $context = array()) {
  if (in_array($node->type, (array)node_gallery_get_types('image'))) {
    //All nodes are set to the same weight
    if (is_numeric($context['imageweight'])) {
      $node->weight = $context['imageweight'];
    }
    //VBO is sending us a list of nodes to modify with different weights
    else {
      $node->weight = $context['imageweight'][$node->nid];
    }
  }
}
While not always obvious, there’s not too many bulk operation conditions that VBO can’t handle. Hats off to infojunkie for writing such a helpful module that is also easily integrated with!
HipHop PHP and Drupal
So, Facebook has released HipHop PHP - a PHP-to-C++ converter. While the name is stupid, the idea is not. 100% of their developers know PHP, I would guess that less than 5% of them are proficient at C++. So, HipHop takes their PHP code, and converts it to compiled C++ – in turn, they get a huge boost in performance and get to keep their existing developers. HipHop is also it’s own webserver too - fun! My first thought was: I wonder what this could mean for Drupal? Well, David Struass, a maintainer of Pressflow (a set of patches for Drupal performance and scalability) put up a blog post about what it would take for Pressflow and Drupal to become HipHop-friendly. Exciting times!
Apache Mod_proxy '[Error] (13)Permission Denied' Error on RHEL
Had an interesting issue today working on a mod_proxy setup of Apache forwarding requests in a reverse proxy setup to a backend Tomcat server. No matter what I did, I kept getting this in Apache’s error log:
[error] (13)Permission denied: proxy: AJP: attempt to connect to 10.x.x.x:7009 (virtualhost.virtualdomain.com) failed
I thought for sure it was proxy permissions, but nothing I did fixed the issue. Then it hit me: SELinux! Why I always think of SELinux last when it’s responsible for 90% of my problems, I’ll never know. SELinux on RHEL/CentOS by default ships so that httpd processes cannot initiate outbound connections, which is just what mod_proxy attempts to do. If this is your problem, you’ll see something like this in /var/log/audit/audit.log:
type=AVC msg=audit(1265039669.305:14): avc:  denied  { name_connect } for  pid=4343 comm="httpd" dest=7009
scontext=system_u:system_r:httpd_t:s0 tcontext=system_u:object_r:port_t:s0 tclass=tcp_socket
To fix this, first test by setting the boolean dynamically (not permanent yet):
/usr/sbin/setsebool httpd_can_network_connect 1
If that works, you can set it so that the default policy is changed and this setting will persist across reboots:
/usr/sbin/setsebool -P httpd_can_network_connect 1
Hope this saves others some time!