Sorry for the lack of posts as of late – a massive upgrade operation at
$DAYJOB has had me out of commission for a few weeks. Also, I’ve had the great
fortune to be able to be part of a migration to Drupal which exposed me to
migrate and friends. Yes, I said “great
fortune” in the same sentence with “migration” without using a negative -
that’s just how awesome this module is. My first impression when looking at
the documentation for migrate was that it didn’t seem complete. While it’s
true that the documentation could be better (what module couldn’t use better
documentation?), the problem is that no two migrations are alike. Because of
this, the best documentation is not going to be written by the module authors,
it will be written by the module users - they are the ones that come up with
the recipies to fill the cookbook. There are several good reasons why there
aren’t many recipes available:
- Developers don’t like doing migrations. It can be painful, and often takes quite a bit of time.
- Users don’t like migrations. They see a migration of data as something easily done, and they often get sticker shock when presented with estimates for a large migration.
- Migration code is written in a flurry before the site is active. Right before launch, development crescendos, and then is often never used again (because no two migrations are the same).
This being my first migration, I vowed that I would document my experience,
because I learned so much from it. In this particular migration, we had to
migrate a huge XML file into about 2,200 nodes in 3 content types. Read on for
my contribution to the cookbook! First, some discussion on the general
workflow and some design decisions. Since I had to get XML into the database
before I could run the migrate, I wrote a command line script to do just that.
When you need to manipulate data between your source and destination (i.e.,
change all references to www.olddomain.com to www.newdomain.com), you usually
have to do this via the hooks that the migrate module provides. In my case,
there were a few cases where doing the data munging in the command line script
was much easier than doing it within the hooks. The problem with making
transformations within the command line script is that with every change, I
had to re-run the script. This wasn’t a big deal, as the XML to MySQL script
took around 15 seconds to complete. I also quickly discovered that if you have
less than 10 entities of one type (Story content type, user, etc), it’s
usually better to just hand-migrate them. The most straight-forward migration
will take 1 hour at a minimum to setup and test – if it will take less than
that to copy/paste, save your time and do it the less sexy way. Since we had
to transform the XML into MySQL tables, and there was a lot of data in the XML
that we didn’t need, I decided the best way to dynamically change what we
import and what we didn’t was by using hook_install() and Drupal’s DB schema
API. By naming the MySQL table columns the same as the XML attributes, we can
add and remove data to be transformed quite easily. Lastly, I need to re-
iterate that this was my first migration. What I describe here works for me,
but may very well not be the best way to do it. Also, I will not duplicate
what you can learn from the migrate module documentation, so make sure to read
that first. Let me know any suggestions you may have in the comments.
Install Module Dependencies
The first step is to install module dependencies. You’ll need
Views,
Schema, Table Wizard(tw). You’ll also want to install
Migrate, and Migrate Extras if you want to do any work
with CCK fields. I must admit that I hadn’t seen Table Wizard before this
project, but it will always be present in my dev installs from here out. If
you find yourself using SQLYog, PHPMyAdmin, or some other tool to simply look
at data in the database, be sure to check it out.
Create Our Custom Module
As I mentioned above, we are relying on the Drupal Schema API to make a lot of
this easy, so let’s make a custom module that sets up our schemas for us.
We’ll call this module my_import. Create a new directory in your modules
directory, and name it my_import. First, create my_import.info with this
inside:
name = My Import
description = "An import module."
core = 6.x
dependencies[] = migrate
dependencies[] = migrate_extras
dependencies[] = content
dependencies[] = path_redirect
package = Database
Nothing too wild here, just requiring some modules that we’ll
be using later. Now, create my_import.install in the same directory with this
inside:
<?php
function my_import_schema() {
  $schema = array();

  $schema['clickability_articles'] = array(
    'fields' => array(
      'id' => array(
        'type' => 'int',
        'not null' => TRUE,
        'description' => t('Clickability article ID'),
      ),
      'createDate' => array(
        'type' => 'datetime',
        'not null' => TRUE,
        'description' => t('Clickability article creation date.'),
      ),
      'editDate' => array(
        'type' => 'datetime',
        'not null' => TRUE,
        'description' => t('Clickability article edit date'),
      ),
      'title' => array(
        'type' => 'text',
        'not null' => TRUE,
        'description' => t('Clickability article title'),
      ),
      'author' => array(
        'type' => 'text',
        'not null' => FALSE,
        'description' => t('Clickability content author (optional)'),
      ),
      'articleauthor' => array(
        'type' => 'text',
        'not null' => TRUE,
        'description' => t('Clickability article author'),
      ),
      'summary' => array(
        'type' => 'text',
        'not null' => TRUE,
        'description' => t('Clickability article short summary'),
      ),
      'body' => array(
        'type' => 'text',
        'not null' => TRUE,
        'size' => 'big',
        'description' => t('Clickability article body'),
      ),
      'placement' => array(
        'type' => 'text',
        'not null' => FALSE,
        'description' => t('Clickability article related article placement lists'),
      ),
      'thumbnail' => array(
        'type' => 'text',
        'not null' => FALSE,
        'description' => t('Clickability article thumbnail'),
      ),
      'image' => array(
        'type' => 'text',
        // @todo: Some articles do not have an image, but we require Master Image to be set.
        'not null' => FALSE,
        'description' => t('Clickability article image'),
      ),
      'image2' => array(
        'type' => 'text',
        'not null' => FALSE,
        'description' => t('Clickability article image page 2'),
      ),
      'image3' => array(
        'type' => 'text',
        'not null' => FALSE,
        'description' => t('Clickability article image page 3'),
      ),
      'master_image_byline_title' => array(
        'type' => 'text',
        'not null' => FALSE,
        'description' => t('Clickability article image page 7'),
      ),
      'tags' => array(
        'type' => 'text',
        'not null' => FALSE,
        'description' => t('Clickability article image page 7'),
      ),
      'status' => array(
        'type' => 'text',
        'not null' => TRUE,
        'description' => t('Clickability article status'),
      ),
      'websitePlacements' => array(
        'type' => 'text',
        'not null' => TRUE,
        'description' => t('Clickability book review status'),
      ),
      ),
    'primary key' => array('id'),
  );
  return $schema;
}

function my_import_install() {
  $ret = drupal_install_schema('my_import');
  return $ret;
}

function my_import_uninstall() {
  $ret = drupal_uninstall_schema('my_import');
  return $ret;
}
When I created the schema, I took care to make sure
that the column names in my table exactly matched the attributes and elements
I was looking to pull out of the XML file. This saves a lot of coding later.
Any time we change the schema, you can create a hook_update_N() function, or
just change the schema and disable+uninstall+install the custom module. I did
the latter with a drush alias and it worked well. The hook_install() and
hook_uninstall() functions simply add and remove the tables.
Setup the Command Line Script to Import the XML into the DB
Create the file myimport.php in your module directory, and paste in the
following:
#!/usr/bin/php
<?php
// get the path to our XML file
$args = getopt("f:");

// Bootstrap Drupal
require_once './includes/bootstrap.inc';
drupal_bootstrap(DRUPAL_BOOTSTRAP_FULL);

// Make sure my_import is enabled
if (!module_exists('my_import')) {
  echo "I need the my_import module enabled!  Exiting.\n";
  exit(1);
}

/*
 * Make sure our media directory exists.
 * We will import from this directory into whatever directory filefield is configured for
 * so we should remove this dir when done with the migration.
 */
$media_dir = file_directory_path() .'/migrated';
echo "Media dir = $media_dir\n";
if (! is_dir($media_dir)) {
  mkdir($media_dir);
}

// Slurp in our XML file.  If your XML file is huge, watch your PHP memory limits
$xml = simplexml_load_file($args['f']);
echo "XML Loaded.\n";

$rowcount = 0;
// Here we iterate over each child of the root of the XML, which in our case is a Article
foreach ($xml->children() as $content) {
  // Setup our $obj object which represents a row in the DB, and use some caching to
  // not abuse drupal_get_schema().
  $obj = new stdClass;
  static $schema = array();

  // Dereference our child from the parent $xml, or xpath performance sucks hard
  $content = simplexml_load_string($content->asXML());

  $table = NULL;
  $content_type = NULL;
  switch((string) $content['type']) {
    // Add more case statements for more content types as needed
    case 'Article':
      $table = 'clickability_articles';
      $content_type = 'article';
      break;
    // All cases below are silently ignored - we are not importing them
    case 'Book Reviews':
    case 'Blog Topic':
    case 'Event':
    case 'Job':
      // Ignored
      break;
    default:
      // Any content type not accounted for gets reported
      echo "Warning: unknown content of type ". $content['type'] ."\n";
  }
  if (isset($table)) {
    if (! isset($schema[$table])) {
      // Get the table schema from Drupal
      $schema[$table] = drupal_get_schema($table);
      // On first run, truncate the table
      $sql = "truncate table {$table}";
      db_query($sql);
      echo "$table truncated.\n";
    }
    // This function does the heavy lifting, creating the $obj object from the XML data
    $obj = xml2object($content, $schema[$table], $content['type']);
    // There are some cases where $obj is intentionally null, only write to the db if not null
    if ($obj) {
      $ret = drupal_write_record($table, $obj);
      if ($ret) {
        $rowcount++;
      }
    }
  }
}
echo "Inserted $rowcount rows.\n";

function xml2object($xml, $tableschema, $content_type) {

  global $media_dir;
  $obj = new stdClass;
  // Our main iterator is the column names in the table
  foreach (array_keys($tableschema['fields']) as $field) {
    switch($field) {
      case 'master_image_byline_title':
        // This field is populated when we work with the images later on
        break;
      case 'id':
        $obj->$field = $xml[$field];
        break;
      case 'status':
        $obj->$field = (string)$xml->$field;
        break;
      // A Clickability placement roughly corresponds to a Drupal term
      case 'placement':
        $element =  array_pop($xml->xpath("//field[@name='$field']"));
        $obj->$field = (string)$element->row->value;
        $obj->$field = map_taxonomy($obj->$field, $content_type);
        break;
      case 'author':
        $element =  array_pop($xml->xpath("//field[@name='$field']"));
        $obj->$field = (string)$element->value;
        break;
      case 'image2':
      case 'image3':
        // Combine image2 and image3 elements in Clickability into our multivalue filefield as csv
        if ($content_type == "Article") {
          $mediaplacement = array_pop($xml->xpath("//mediaPlacement[@name='$field']"));
          // migrate module requires full path to filefield source
          $obj->$field = getcwd() .'/'. $media_dir .'/'. (string)$mediaplacement->media->path;
          if (substr($obj->$field, -1, 1) == '/')  {
            $obj->$field = NULL;
          }
          else {
            if (!empty($obj->image)) {
              $obj->image .= ",";
            }
            $obj->image .= $obj->$field;
          }
        }
        break;
      case 'thumbnail':
      case 'image':
        $mediaplacement = array_pop($xml->xpath("//mediaPlacement[@name='$field']"));
        // migrate module requires full path to filefield source
        $obj->$field = getcwd() .'/'. $media_dir .'/'. (string)$mediaplacement->media->path;
        // Check the schema.  If the field is required, then fill in a default, otherwise wipe it
        $required = $tableschema['fields'][$field]['not null'];
        // If the file path ends in a /, then the XML did not have an image for this article
        // -- if we require one, make a default
        if (substr($obj->$field, -1, 1) == '/')  {
          if ($required) {
            echo "$content_type with ID of ". $obj->id ." does not have a $field.  Adding test.gif.\n";
            $obj->$field .= "test.gif";
            touch($obj->$field);
          }
          else {
            // NOTE: We need this patch for this to work: http://drupal.org/node/780920
            $obj->$field = NULL;
          }
        }
        else {
          // Transfer the caption on the image in the XML to the CCK byline accreditation
          $obj->master_image_byline_title = (string)$mediaplacement->caption;
          // See if the file exists on the filesystem
          if (! file_exists($obj->$field)) {
            // Nope, let's fill it in with our default image
            echo $obj->$field ." does not exist, replacing with test.gif.\n";
            $obj->$field = preg_replace('#^(.*)/(.*)$#', '\1/test.gif', $obj->$field);
          }

          // Replace .bmp with .jpg
          $jpg = preg_replace('/\.bmp$/', '.jpg', $obj->$field);
          if ($jpg != $obj->$field) {
            if (file_exists($jpg)) {
              $obj->$field = $jpg;
            }
            else {
              // Tell the user what to do to create the image and exit.
              echo "ID ". $obj->id ." has a image of type bmp, and no jpg found on the file system.\n";
              echo "Create them by running 'mogrify -format jpg /path/to/*.bmp' and re-run this script.\n";
              exit(1);
            }

          }
        }
        break;
      // Any DB column not explicity defined above maps cleanly with the code below
      default:
        $obj->$field = (string)array_pop($xml->xpath("//field[@name='$field']"));
        break;
    }

  }

  // We assume it does not need imported until we prove otherwise
  $needs_imported = FALSE;
  $tags = array();
  $websitePlacements = array();
  foreach ($xml->xpath("//websitePlacement") as $websitePlacement) {
    // Only if the XML says the domain is www.newdomain.com do we need to import
    if ($websitePlacement->domain == 'www.newdomain.com') {
      $needs_imported = TRUE;

      // Convert the old "sections" into tag taxonomy
      $tags[] = substr($section, 1, strlen($section));

      // Grab the old URLs from websitePlacement, and place them on an array
      $section = (string)$websitePlacement->section;
      $oldurl = $section .'/'. $obj->id .'.html';
      $websitePlacements[] = $oldurl;

      // If we do not have a placement yet, we try to set some form of taxonomy
      if (! isset($obj->placement)) {
        $taxo = map_taxonomy($section, $content_type);
        // NOTE: We need this patch for this to work: http://drupal.org/node/780920
        $obj->placement = $taxo;
      }
      // If the XML did not explicity tell us the createDate, we use the start date from the webSitePlacement
      if (empty($obj->createDate)) {
        $date = (string)$websitePlacement->startDate;
        $obj->createDate = substr($date, 0, strlen($date) -4);
        $obj->editDate = $obj->createDate;
      }
    }
  }
  $obj->websitePlacements = implode(',', $websitePlacements);
  $obj->tags = implode(',', $tags);

  // Return the object only if we need it imported
  return $needs_imported ? $obj : NULL;
}

function map_taxonomy($oldtext, $content_type) {
  // Simple maps of Clickability placements to Drupal terms
  if ($content_type == 'Job') {
    return NULL;
  }
  if (preg_match('/building/i', $oldtext)) {
    return "Green Building";
  }
  if (preg_match('/(clean|energy)/i', $oldtext)) {
    return "Clean Energy";
  }
  if (preg_match('/financ/i', $oldtext)) {
    return "Finance";
  }
  if (preg_match('/food/i', $oldtext)) {
    return "Food & Farms";
  }
  if (preg_match('/marketing/i', $oldtext)) {
    return "Green Marketing";
  }
  if (preg_match('/recycled/i', $oldtext)) {
    return "Recycled Markets";
  }
  if (preg_match('/technol/i', $oldtext)) {
    return "Technology";
  }
  if (preg_match('/leaders/i', $oldtext)) {
    return "Business Leaders";
  }
  if (preg_match('/transportation/i', $oldtext)) {
    return "Transportation";
  }
  return NULL;
}

?>
Wow, that’s a lot of code. I’ve commented
it pretty heavily, but here’s the “40,000 foot view” of what’s going on:
- Lines 1-26: Nothing too fancy here. I should note that the script expects to be executed from your Drupal root directory. It grabs the path to the XML file from the command line and does some sanity checking.
- Lines 28-30: Here we use PHP’s SimpleXML API to load the entire XML file into an object. If you have a huge XML file and/or small PHP memory limits, you will likely have to use XML Parser or another library. The power and convenience of SimpleXML is a pretty convincing argument to temporarily upping your memory limits in this case.
- Lines 34-82: This is the main loop which iterates over each Article in the XML file. By looking at the content type in the XML record, we determine what table and content type to use for Drupal. The first time a schema is loaded, we truncate the table in the database. Once we determine some metadata about the record, we call xml2object() on line 72 which does most of the work for us. Once we have an object, we store it to the database.
- Lines 84-222: Here we have the xml2object() function, and yes, it’s way too long and should be broken up. But hey, it’s migration code, who else will ever see it??? We’ll break it down more below.
- Lines 89-182: This code runs a for loop around each column in the table. Since we’re using the Schema API here, we can safely assume that the column order specified in our install file will be duplicated when we fetch it in our script. For each column type in the table, it attempts to pull the data needed from the XML record, transform it if necessary, and store it in our $obj object. Read the code for details on what is happening to each field on the way in.
- Lines 184-218: Now that we have iterated over all the fields in the schema, we can use the data stored in $obj to calculate other fields we need. Again, read the code for details, but here we are setting taxonomy terms, URLs for use with path_redirect, and filling in other data that may have been missing from the XML.
- Lines 224-257: Is a simple example on how to statically map some data in the XML to return taxonomy terms in Drupal
Now that we’ve got that out of the way, let’s create our module file.
Create my_import.module
Now, create a file in your module directory named my_import.module. This file
will contain the actual module used by Drupal and will implement some of the
migrate modules hooks. You might ask, why not deal with everything in the
command line script? There are two primary reasons why:
- You may come across a condition where you need the nid of the node (i.e. create path redirects), or otherwise interact with the $node object. You can only get this information from implementing migrate’s hooks.
- While I personally found it easier to manipulate taxonomy terms via the command line script and then rely upon the out-of-the-box code supplied with migrate to setup the node for me, this has a drawback. Any time you change the command line script, you must “clear” your imported data, re-run the command line script, and re-import your data using the migrate module. If you make changes to your module, you only have two steps to test (clear and re-import).
Paste this code into my_import.module:
<?php
define(NUM_PARAGRAPHS_PER_PAGE, 6);

function my_import_migrate_prepare_user(&$user, $tblinfo, $row) {
  // Randomly assign passwords to users, forcing them to reset their password
  $errors = array();
  $user['pass'] = preg_replace("/([0-9])/e","chr((\\1+112))",rand(100000,999999));
  return $errors;
}

function my_import_migrate_prepare_node(&$node, $tblinfo, $row) {
  $errors = array();
  // In Clickability, there were multiple states that represented "Published", here we map them.
  $status = $tblinfo->view_name .'_status';
  switch($row->$status) {
    case 'live':
    case 'APPROVED':
      $node->status = 1;
      break;
    default:
      $node->status = 0;
      break;
  }

  if ($node->type == 'article') {
    // Paginate articles by inserting a pagebreak tag every 6th paragraph to emulate Clickability's pagination
    $paragraphs = preg_split('#<br />\s*<br />#s', $node->body);
    if (count($paragraphs) > NUM_PARAGRAPHS_PER_PAGE) {
      $node->body = '';
      $i = 1;
      foreach ($paragraphs as $paragraph) {
        if (($i % NUM_PARAGRAPHS_PER_PAGE) == 0) {
          $node->body .= $paragraph . "\n[pagebreak]\n";
        }
        else {
          $node->body .= $paragraph ."<br />\n<br />\n";
        }
        $i++;
      }
    }

  }
  return $errors;
}

function my_import_migrate_complete_node(&$node, $tblinfo, $row) {
  $errors = array();
  // Create redirects for old URLs
  $field = $tblinfo->view_name .'_websitePlacements';
  foreach(explode(',', $row->$field) as $oldurl) {
    // Delete any old redirects
    if (substr($oldurl,0,1) == '/') {
      $oldurl = substr($oldurl,1);
    }
    path_redirect_delete(array('source' => $oldurl));
    $redirect = array(
      'source' => $oldurl,
      'redirect' => '/node/'. $node->nid,
      'type' => 301,
    );
    path_redirect_save($redirect);
  }
  return $errors;
}
Here’s the high-level breakdown, check the code+comments for
the details.
- Lines 5-10: Just a quick example of how to set a random password on any user that is imported.
- Lines 12-24: hook_migrate_prepare_node() is executed before the node has been saved to the database, and should be where the majority of your code is at. These lines set any article with a status of ‘live’ or ‘APPROVED’ to published in Drupal.
- Lines 26-41: This code uses some regex magic to create a pagebreak every 6th paragraph. This is what Clickability did, and the client wanted to keep this on their migrated articles.
- Lines 47-65: hook_migrate_complete_node() is called after the node has been saved to the database, and it has a nid at this point. The client wished to migrate their old URL’s to Drupal – in order to do that we must have the nid to know where to redirect to.
Create sample XML
Finally, let’s create some sample data so we can see how this all meshes
together. Create the file content.xml in your module directory, and paste this
in it:
<?xml version="1.0" encoding="utf-8"?>
<cmPublishImport>
  <content type="Article" id="7241321">
    <field name="title"><![CDATA[Donec risus purus]]></field>
    <field name="author">
      <value><![CDATA[Me]]></value>
    </field>
    <field name="articleauthor"><![CDATA[Me]]></field>
    <field name="date"><![CDATA[2007-04-29]]></field>
    <field name="summary"><![CDATA[Donec risus purus]]></field>
    <field name="body"><![CDATA[Donec risus purus, euismod eu volutpat ac, pharetra non nulla. Vestibulum quis neque lacus. Donec sit amet tortor nisi. Nam et lectus nec turpis consequat rhoncus. Proin porttitor, quam nec faucibus pulvinar, arcu magna facilisis erat, eu imperdiet risus tortor ac quam. Praesent non justo ac nisl ultricies condimentum a eget arcu. Nam in mi est. Donec risus orci, imperdiet ut tempus et, pulvinar nec diam. Donec eleifend pulvinar aliquam. Nulla faucibus turpis nec neque scelerisque convallis. Fusce gravida pulvinar quam, sit amet faucibus risus sodales ornare. Nullam arcu risus, lacinia vel faucibus at, auctor eget diam. Quisque a neque ac tellus bibendum luctus fringilla in lacus. Praesent id nunc eu dolor adipiscing consequat vel eget leo. Donec velit mi, pharetra quis tincidunt id, laoreet et dolor. Vestibulum fringilla rutrum arcu at accumsan.<br/>
<br/>
Cras pellentesque sagittis mi. Pellentesque cursus nisl id nunc suscipit luctus. Duis pellentesque rhoncus sodales. Nullam dictum augue ac diam fermentum vel feugiat mauris euismod. Mauris nec metus eu sem tristique euismod. Etiam lorem est, accumsan vitae bibendum sit amet, tempus sit amet urna. Nullam lobortis adipiscing convallis. Nullam scelerisque sagittis tellus vitae interdum. Integer eget interdum nunc. Nam ligula orci, bibendum ac mattis eget, mollis at massa.<br/>
<br/>
Vestibulum sodales elit vel est feugiat vitae dapibus erat ultricies. Proin auctor quam sit amet nisi aliquet pharetra. Curabitur tristique quam vel tortor gravida scelerisque. Morbi laoreet aliquet mi, sed imperdiet mauris mattis et. Praesent non quam nec lorem dapibus semper. Quisque vulputate neque et turpis placerat bibendum. Phasellus suscipit urna eget augue ullamcorper ultricies. Curabitur hendrerit dui sit amet elit elementum nec venenatis orci tempor. Fusce semper vestibulum odio vitae porta. Mauris non tellus non mi hendrerit suscipit in sed ante. Donec arcu neque, tristique ut elementum sed, suscipit at leo. Curabitur eget enim quis leo scelerisque laoreet et eget augue. Fusce posuere est ac felis fringilla consectetur. Nulla elit magna, pharetra sit amet tincidunt sed, tristique sed mi. Nam iaculis, elit sit amet condimentum blandit, massa neque pharetra justo, non ornare ligula ante non leo. Praesent ullamcorper suscipit tempus. In varius, neque eget volutpat posuere, velit odio luctus turpis, ac varius nulla erat sit amet justo. Quisque convallis mollis pharetra. Aliquam porta dolor quis nunc tempor vitae pharetra lectus ultricies. Fusce egestas sagittis sapien, sit amet pharetra sem ullamcorper a.<br/>
<br/>
Ut dui tortor, porta eu ultrices sed, interdum vitae lectus. Integer facilisis velit sit amet dui ultricies lobortis. Fusce ut malesuada tellus. Aenean in nibh at lorem iaculis dictum vitae in nulla. Etiam dapibus lacinia eleifend. Aliquam erat volutpat. Nullam sit amet sapien ut risus consequat posuere eu quis quam. In lobortis fringilla felis quis pretium. Suspendisse non nisl libero, non tempor justo. Nunc volutpat nulla vitae lacus tincidunt feugiat congue sapien commodo. Suspendisse venenatis aliquet ante in hendrerit. Sed lectus ligula, gravida id tincidunt et, feugiat non justo.<br/>
<br/>
Sed metus tellus, vestibulum in mollis quis, imperdiet et velit. Praesent suscipit elit et mi rutrum sit amet gravida augue iaculis. Etiam nec tellus nec augue porttitor pharetra. Vivamus feugiat mollis est, eu aliquam neque tempus a. Ut magna mauris, sollicitudin in ornare non, lacinia a lacus. Aenean porttitor magna ac sem ornare pellentesque. Aliquam mattis dolor in metus molestie ut feugiat mi auctor. Etiam laoreet pulvinar ipsum id bibendum. Class aptent taciti sociosqu ad litora torquent per conubia nostra, per inceptos himenaeos. Quisque porttitor convallis lacus, nec pretium leo varius non. Morbi non dapibus diam. Sed nec venenatis diam. Cras mollis porta tempor.<br/>
<br/>
Donec ornare mi sed tellus porta luctus. Nulla euismod venenatis ante, in rhoncus felis ornare non. Cras tempor venenatis est at gravida. Etiam imperdiet dolor vitae ipsum lacinia imperdiet. Maecenas purus lorem, rhoncus non porttitor in, semper nec quam. Integer ullamcorper facilisis ultrices. Vivamus porttitor lacinia augue in venenatis. Quisque interdum euismod tellus, et consectetur nunc dictum sit amet. Maecenas pulvinar placerat mauris, quis auctor purus pellentesque at. Vestibulum vulputate, tellus id eleifend posuere, ligula erat hendrerit orci, nec lobortis tortor sapien ut ligula. Donec id augue leo, non consectetur nisl. In viverra dictum lorem eget blandit. Etiam tempus nisl ac nibh viverra id cursus eros luctus. Duis ut tellus nisi.<br/>
<br/>
Class aptent taciti sociosqu ad litora torquent per conubia nostra, per inceptos himenaeos. Aliquam quis justo risus, eget eleifend nibh. Morbi quis dolor nulla, sed cursus metus. Vestibulum vel ipsum non erat tincidunt luctus et eget sapien. Nunc vel justo ante, vel auctor purus. Proin vulputate bibendum placerat. Fusce vel tincidunt nunc. Praesent at eros in dolor faucibus blandit et vitae magna. Fusce arcu nisl, sollicitudin sed accumsan sed, rhoncus at tellus. Ut ut mauris vel ipsum bibendum ullamcorper eget sed neque. Class aptent taciti sociosqu ad litora torquent per conubia nostra, per inceptos himenaeos. Sed dui massa, imperdiet sit amet lacinia id, rutrum sed orci. Proin pharetra risus eu risus gravida convallis id ac mi. Etiam a neque ut lacus convallis accumsan non eget arcu. Sed blandit velit id lectus tincidunt ut aliquet mi egestas. Aliquam cursus odio vitae turpis suscipit mollis et aliquam purus. Suspendisse pretium tincidunt porttitor. Nunc vestibulum, lacus at auctor laoreet, orci lectus volutpat diam, ut mollis risus lectus a ligula.<br/>
<br/>
Phasellus id urna sit amet elit pretium viverra sit amet eget felis. Maecenas sed arcu sed eros fringilla commodo id non magna. Maecenas urna mauris, cursus vel mattis et, volutpat in purus. Nulla sapien orci, faucibus sed tincidunt tincidunt, tristique id lacus. Nullam tortor libero, porttitor eget faucibus eget, vehicula a enim. Suspendisse malesuada consectetur mattis. Integer dapibus dignissim tempor. In viverra luctus orci sed placerat. Suspendisse aliquam mattis diam mattis dapibus. Aenean suscipit purus eu ipsum dignissim in aliquet urna mollis. Duis nibh magna, fringilla eu ultrices posuere, sodales sed felis. Proin varius dignissim sem a consequat. Pellentesque facilisis felis vel mi malesuada placerat. Curabitur gravida euismod mi in molestie. Vivamus sit amet dui leo. Praesent mi justo, bibendum at rutrum ac, bibendum ut felis. Nullam nec dolor dui, quis imperdiet nulla. Morbi semper pulvinar risus.]]></field>
    <mediaPlacement name="image">
      <media id="577286">
        <path>images/1.jpg</path>
        <caption><![CDATA[Cows at Three Mile Canyon provide resources such as methane and compost for on-farm operations.]]></caption>
      </media>
    </mediaPlacement>
    <status>live</status>
    <websitePlacement>
      <domain>www.newdomain.com</domain>
      <section>/foodandfarms</section>
      <startDate dateFormat="yyyy-MM-dd HH:mm:ss zzz">2007-04-29 14:00:00 PDT</startDate>
    </websitePlacement>
    <websitePlacement>
      <domain>www.olddomain.com</domain>
      <section>/greenmarketing</section>
      <startDate dateFormat="yyyy-MM-dd HH:mm:ss zzz">2007-04-29 14:00:00 PDT</startDate>
    </websitePlacement>
  </content>
</cmPublishImport>
Enable the my_import Module and Run the Command Line Script
Now (finally), it’s time for some action. Enable your newly created my_import
module, and jump out to the shell. Assuming your Drupal root is at
/var/www/drupal, cd into that directory. Create the new directory
sites/default/files/migrated/images, and place a jpg named 1.jpg in that
directory. Now run the import script:
php5 ./sites/all/modules/my_import/myimport.php -f ./sites/all/modules/my_import/content.xml
With luck, the script will succeed, and you will have 1 row of data in your
clickability_articles table! If not, fix the error (if you’re using the sample
data, let me know what went wrong and I’ll fix it). Next up, Table Wizard
configuration.
Expose the Table to Table Wizard
All the hard work is done now - we can use a web UI from here on out. Visit
/admin/content/tw in your browser, and under the “Add Existing Tables”
fieldset, and select the tables you imported with myimport.php. If your tables
are huge (50K+ rows), you may want to select “Skip full analysis”. Click the
“Add tables” button. At this point, that’s all we need from Table Wizard, but
I strongly encourage you click around a bit. The table analysis can tell you
some handy things about your data.
Create the Migrate Content Set
In the previous step, we essentially built a view that we can provide to the
Migrate module. Now we need to tell Migrate how to use the view. Visit the
Migrate settings at /admin/content/migrate/settings. If you can, implement the
changes it recommends to .htaccess as it will speed up the import
considerably. Also, make sure to expand the “Migration support implemented in
the XYZ module” fieldsets and enable the support you need for your import.
Now, visit the dashboard at /admin/content/migrate. Expand the “Add a content
set” fieldset, and fill in the values. When choosing the value for “Source
view from which to import content”, scroll down towards the bottom of the
list. All Table Wizard views are prefixed with “tw: ”, so the one we’re
looking for here is “tw: clickability_issues (clickability_issues)”. You can
leave “View arguments” and “Weight” to defaults. The next screen is where the
real magic happens. By interrogating the view, Migrate presents you with a map
fields form that allows us to select our source column from a dropdown to
assign to various node elements. If you have a setting that should remain
constant across all imported records (“Node: Input format” is usually a good
example), you can type in a default value here. The rest should be fairly self
explanatory. Click “Submit changes”, and you’ll be taken back to the
dashboard.
Run the Import, Clear the Import, Wash, Rinse, Repeat
Now, the way I did my testing was to choose one row from the source table to
import. Grab its primary key and copy it to the clipboard. Check the box under
“Import” for our content set, then expand the “Execute” fieldset. Paste the ID
into the “Source IDs:” text field, and click the Run button. With any luck,
you will be returned to the dashboard, but the content set will show 1
imported. Hopefully there will be no errors, but if there are, find and fix
the problem. You can view the old primary key mapping to the node ID by going
back to /admin/content/tw and looking for a view named
migrate_map_si_articles. This table is created by the Migrate module – it
uses this table to track what has been imported, and what NID the imported
nodes have. Grab that nid, and load up /node/[nid]. If it looks good, then we
can to a bigger import. Go back to the Migrate dashboard, and this time click
the “Clear” checkbox next to the content set. Expand “Execute”, make sure all
fields are blank, and click the Run button. This process will “unimport” the
row we just imported. Now, depending on your row count, you may want to import
all rows and see what happens. Since I was dealing with thousands of nodes, I
did an import of just 100 nodes to make sure things were okay. To do this,
instead of specifying “Source IDs”, place the number 100 in “Sample Size”, and
click Run. To import everything, leave all fields blank. The power to quickly
and easily remove all changes made by the migrate module is huge. Because of
this “safety net”, it lets you work on the import within the same development
sandbox as your designers and themers. They’ll appreciate having something
other than “Lorem Ipsum” to look at!
Run to the Nearest Pub and Celebrate the Completion of Your Migration
If I have to explain this to you, you’re in the wrong field of work!
Summary
This post is my longest to date, and there’s a good chance I missed some
things. By all means, let me know in the comments if you find any holes and
I’ll get it corrected. I hope this case study helps some other Drupalers out
there - when I first started this project I couldn’t find any examples on how
to get XML into Drupal using the Migrate module. Now Google has some spider
food :)
]]>
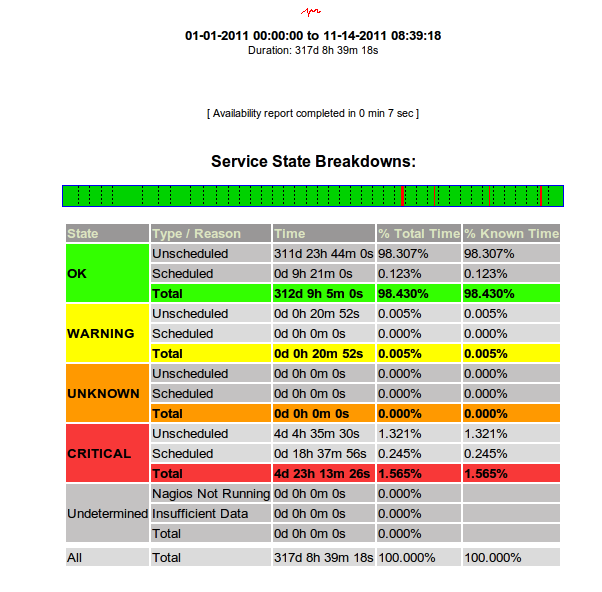 As you
can see, I’m getting less than 2 nines worth of uptime from my node. Each and
everytime there’s been an issue, support has been quick to point out that
they’ve had some sort of SAN issue, and that the SAN is ‘resyncing’. The
problem is that while the SAN is resyncing, I/O to my node is so horrible, I
can’t cat a 500 byte file to stdout in less than 10 seconds. So, the node
will respond to a ping, but it can’t serve up a static image via Apache. For
all intents and purposes, that’s down in my book. The last SAN
synchronization took the better
part of two days, during which time my node was unusable. In my experience,
the SAN is the most important building block when architecting a service
that’s meant to be highly available. Until VPS.net can address their SAN
issues, they are likely to continue to have prolonged downtimes. Until that’s
been fixed, there’s just no way I can recommend their services to anyone.
]]>
As you
can see, I’m getting less than 2 nines worth of uptime from my node. Each and
everytime there’s been an issue, support has been quick to point out that
they’ve had some sort of SAN issue, and that the SAN is ‘resyncing’. The
problem is that while the SAN is resyncing, I/O to my node is so horrible, I
can’t cat a 500 byte file to stdout in less than 10 seconds. So, the node
will respond to a ping, but it can’t serve up a static image via Apache. For
all intents and purposes, that’s down in my book. The last SAN
synchronization took the better
part of two days, during which time my node was unusable. In my experience,
the SAN is the most important building block when architecting a service
that’s meant to be highly available. Until VPS.net can address their SAN
issues, they are likely to continue to have prolonged downtimes. Until that’s
been fixed, there’s just no way I can recommend their services to anyone.
]]>
 Location: Buckle Corporate Office & Distribution Center 2407 W
24th Street KEARNEY, Nebraska 68845-0000
Location: Buckle Corporate Office & Distribution Center 2407 W
24th Street KEARNEY, Nebraska 68845-0000
 For all those wondering, I went
to the party as a saboteur on a mission: to drink as much as I could to try
and directly impact their bottom line. Mission accomplished :) Good times @
DCSF2010!
For all those wondering, I went
to the party as a saboteur on a mission: to drink as much as I could to try
and directly impact their bottom line. Mission accomplished :) Good times @
DCSF2010!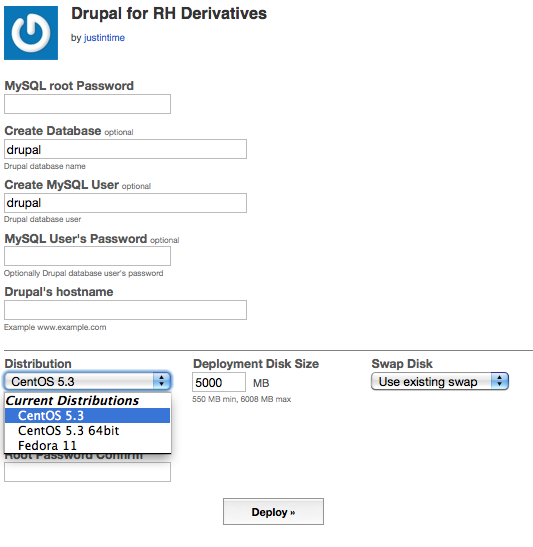 Many of the users of
Linode
appear to prefer Ubuntu, and there’s good reason – it’s a great distribution.
I run it on all my laptops and most of my desktops. However, I personally find
it a bit too bleeding edge for my servers and prefer CentOS for the server
room. Currently there are 16 StackScripts available for Ubuntu, with only 3
available for CentOS. Well, after today, there’s now 6 for CentOS! After
clicking the deploy button, you’ll have the images ready to go in less than a
minute. Boot the config, and the StackScript will run on first boot - when
it’s done, you’ll have a secured and configured LAMP stack,
drush install, Drupal
install, and all updates applied via yum. I’ve published these StackScripts so
that anyone with a
Linode
can use them with their CentOS and Fedora installations:
Many of the users of
Linode
appear to prefer Ubuntu, and there’s good reason – it’s a great distribution.
I run it on all my laptops and most of my desktops. However, I personally find
it a bit too bleeding edge for my servers and prefer CentOS for the server
room. Currently there are 16 StackScripts available for Ubuntu, with only 3
available for CentOS. Well, after today, there’s now 6 for CentOS! After
clicking the deploy button, you’ll have the images ready to go in less than a
minute. Boot the config, and the StackScript will run on first boot - when
it’s done, you’ll have a secured and configured LAMP stack,
drush install, Drupal
install, and all updates applied via yum. I’ve published these StackScripts so
that anyone with a
Linode
can use them with their CentOS and Fedora installations:
 ]]>
]]> Now, setup a Finnix configuration profile. Click on “Create a new
configuration profile”, and type “Finnix Rescue” for the label. For the
kernel, select “Recovery - Finnix (kernel)”. For /dev/xvda, select the
“Recovery - Finnix (iso)”. For /dev/xvdb, select the “Centos 5.4 Install
Disk”. For uncompressed initrd image, select “Recovery - Finnix (initrd).
Leave the other settings at defaults, and save the profile. Here’s what it
should look like:
Now, setup a Finnix configuration profile. Click on “Create a new
configuration profile”, and type “Finnix Rescue” for the label. For the
kernel, select “Recovery - Finnix (kernel)”. For /dev/xvda, select the
“Recovery - Finnix (iso)”. For /dev/xvdb, select the “Centos 5.4 Install
Disk”. For uncompressed initrd image, select “Recovery - Finnix (initrd).
Leave the other settings at defaults, and save the profile. Here’s what it
should look like: 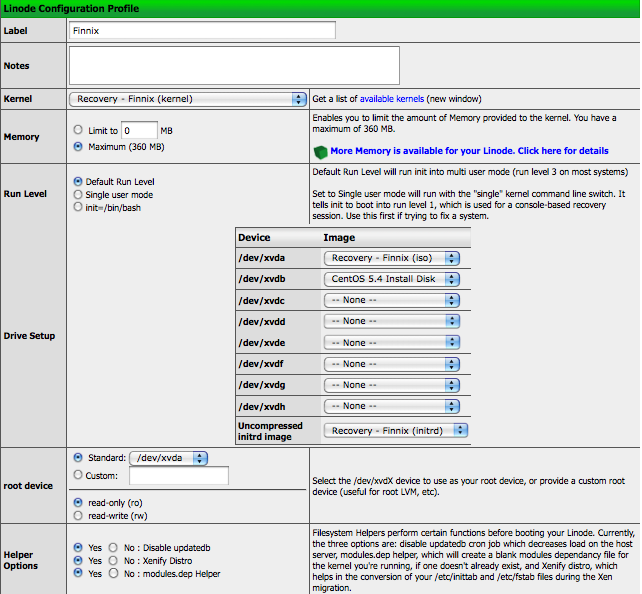
